The article under was contributed by Timothy Malche, an assistant professor within the Division of Pc Purposes at Manipal College Jaipur.
Creating a user-friendly interface for pc imaginative and prescient fashions will be difficult. That is the place Gradio is available in. Gradio is a framework for making internet interfaces for machine studying fashions. Gradio comes with a variety of out-of-the-box parts you should utilize to assemble an internet web page to construct a mannequin playground.
On this article, we’ll discover the right way to construct a pc imaginative and prescient software utilizing Gradio and focus on the UI parts it offers to facilitate this course of.
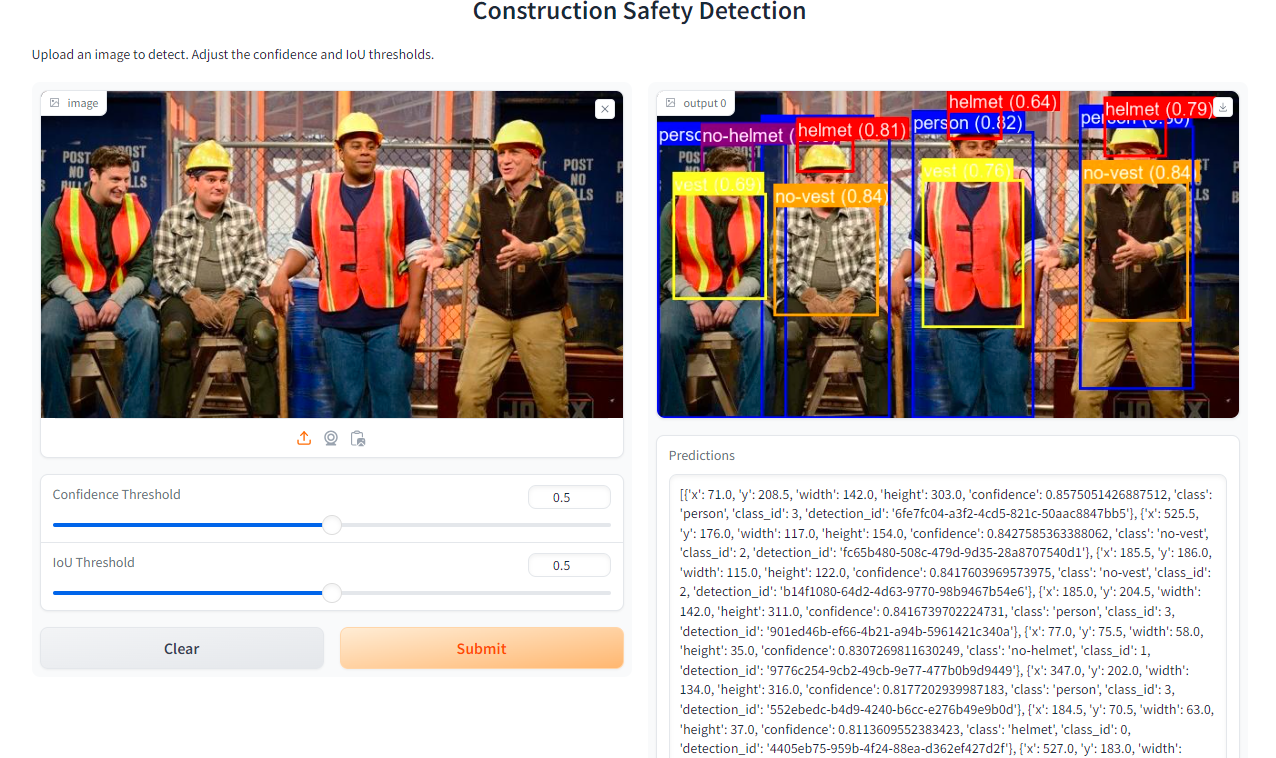
Right here is an instance of an interface constructed with Gradio that runs a Roboflow mannequin:
What’s Gradio?
Gradio is an open-source Python library that means that you can shortly create customizable UI parts to your machine studying fashions. It offers a straightforward technique to combine these fashions into internet functions, enabling customers to work together with them instantly by their browser. Gradio helps all kinds of inputs and outputs, making it a wonderful alternative for constructing pc imaginative and prescient functions.
Set up Gradio
To get began with Gradio, First, it is advisable set up Gradio. You are able to do this utilizing pip:
pip set up gradio Understanding Gradio Elements
Gradio offers totally different pre-built parts that we might use within the Gradio interface of blocks to construct the person interface. All of those parts embrace built-in preprocessing steps that rework person knowledge submitted by the browser right into a format appropriate for a Python perform. These parts additionally embrace postprocessing steps to transform the perform’s output right into a format that may be displayed within the browser.
For instance, take into account an software with three inputs (Textbox, Quantity, and Picture) and two outputs (Quantity and Gallery). Beneath is a diagram illustrating how preprocessing will put together the information for the perform and what put up processing will do with the perform’s output.
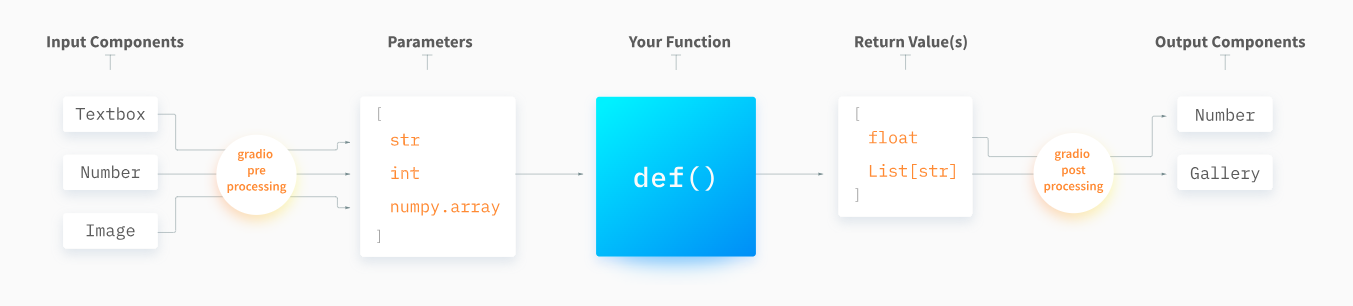
You may see a full checklist of parts you should utilize to construct a Gradio app on the official Gradio interface documentation.
Create a Pc Imaginative and prescient App with Gradio
On this part, we’ll learn to create a pc imaginative and prescient app utilizing Gradio. We’ll discover two examples: one for making predictions on picture knowledge and one other for video knowledge. The frequent steps we’ll observe to construct these examples are as follows.
- Put together your mannequin
- Outline a prediction perform
- Create the interface
- Launch the interface
Instance #1: Inference on picture knowledge
Step #1: Put together Your Mannequin
Earlier than growing a Gradio app, it is important to have a pc imaginative and prescient mannequin prepared. You may shortly create and host a pc imaginative and prescient mannequin utilizing Roboflow. Comply with their getting began information to learn to construct your pc imaginative and prescient mannequin with ease.
In our instance, we’ll use Development Security Detection mannequin API from the Roboflow universe.
Step #2: Outline Your Prediction Operate
On this step, we’ll outline a perform to carry out inference on a picture. We’ll use code from the Roboflow Inference SDK for our prediction perform. The perform infer_image processes an enter picture to carry out inference utilizing a pc imaginative and prescient mannequin deployed on Roboflow. First, it saves the uploaded or captured picture to an area file named “uploaded_image.jpg”.
Then, it makes use of the Roboflow shopper SDK to deduce predictions on this picture, particularly focusing on a mannequin recognized by the ID ” construction-safety-gsnvb/1″.
The predictions, which embrace bounding field coordinates, class labels, and confidence scores, are extracted from the outcome. Every predicted object’s bounding field is drawn on the picture in numerous colours based mostly on predefined class-color mappings.
Moreover, labels indicating the category identify and confidence stage are overlaid on every bounding field. This annotated picture, together with the prediction particulars, is returned by the perform.
# import the mandatory libraries
from inference_sdk import InferenceHTTPClient, InferenceConfiguration
import gradio as gr
from PIL import Picture, ImageDraw, ImageFont
import os # initialize the shopper
CLIENT = InferenceHTTPClient(
    api_url="https://detect.roboflow.com",
    api_key=os.environ["ROBOFLOW_API_KEY"]
) # outline a prediction perform to deduce on a picture
def infer_image(picture, confidence, iou_threshold):
    # save the uploaded or captured picture to a file
    image_path = "uploaded_image.jpg"
    picture.save(image_path)

    # set customized configuration
    custom_configuration = InferenceConfiguration(confidence_threshold=confidence, iou_threshold=iou_threshold)     # infer on the picture utilizing the shopper
    with CLIENT.use_configuration(custom_configuration):
        outcome = CLIENT.infer(image_path, model_id="construction-safety-gsnvb/1")

    # extract predictions
    predictions = outcome.get('predictions', [])

    # outline a colour map for various lessons of the mannequin
    class_colors = {
        "helmet": "crimson",
        "particular person": "blue",
        "vest": "yellow",
        "no-helmet": "purple",
        "no-vest": "orange" # Add different lessons and their corresponding colours right here # "class_name": "colour", } # draw bounding containers on the picture draw = ImageDraw.Draw(picture) attempt: font = ImageFont.truetype("arial.ttf", 20) besides IOError: font = ImageFont.load_default() for pred in predictions: x = pred['x'] y = pred['y'] width = pred['width'] top = pred['height'] left = x - width / 2 high = y - top / 2 proper = x + width / 2 backside = y + top / 2 # get the colour for the category colour = class_colors.get(pred['class'], "inexperienced") # default to inexperienced if class shouldn't be within the colour map draw.rectangle([left, top, right, bottom], define=colour, width=3) # Draw the label label = f"{pred['class']} ({pred['confidence']:.2f})" text_size = draw.textbbox((0, 0), label, font=font) text_width = text_size[2] - text_size[0] text_height = text_size[3] - text_size[1] text_background = [(left, top - text_height - 4), (left + text_width + 4, top)] draw.rectangle(text_background, fill=colour) draw.textual content((left + 2, high - text_height - 2), label, fill="white", font=font) return picture, str(predictions)
Set your your Roboflow API key in your setting like so:
export ROBOFLOW_API_KEY=""
Learn to retrieve your Roboflow API key.
Step #3: Create the Interface
Now that now we have outlined our prediction perform, we’ll create the person interface for our app utilizing gradio.Interface and Gradio parts.
The code snippet initializes a Gradio interface (iface) for a pc imaginative and prescient software targeted on detecting hand management options in uploaded photos. It consists of enter parts for importing photos as PIL objects, and sliders to regulate confidence and IoU thresholds. Outputs include the processed picture with annotated bounding containers and textual predictions. The interface is titled ” Development Security Detection” with an outline guiding customers to add photos for detection whereas adjusting thresholds as wanted.
# create a Gradio interface
myInterface = gr.Interface(
    fn=infer_image,  # perform to course of the enter
    inputs=[
        gr.Image(type="pil"),  # input type is an image
        gr.Slider(0.0, 1.0, value=0.5, step=0.1, label="Confidence Threshold"),
        gr.Slider(0.0, 1.0, value=0.5, step=0.1, label="IoU Threshold")
    ],
    outputs=[
        gr.Image(type="pil"),  # output is an image
        gr.Textbox(label="Predictions")  # output is text
    ],
    title="Development Security Detection",
    description="Add a picture to detect. Alter the arrogance and IoU thresholds.",
)
Step #4: Launch the Interface
The ultimate step will likely be to launch your interface domestically to check it. Gradio will create an area server and open the app in your internet browser. To run the app, save the next script to a file, for instance, gradio_app.py.
Add the next code to the tip of the file:
# launch the Gradio app
if __name__ == "__main__": myInterface.launch()
Then, run:
python gradio_app.py
This can begin an area internet server, and you will notice a URL within the terminal you could open in your internet browser to work together with the app. You may add photos or seize from the webcam, and it’ll show the predictions made by your inference mannequin.
Whenever you run the code, the next output will likely be generated.
Instance #2: Inference on video knowledge
Step #1: Put together Your Mannequin
On this instance, we’ll use Hand Detection mannequin API from the Roboflow universe. You may also prepare your personal mannequin utilizing Roboflow.
Step #2: Outline Your Prediction Operate
On this step, we’ll outline a prediction perform to carry out inference on a video. We’ll use code from the hosted video inferencing for our prediction perform. The infer_video perform is designed to carry out inference on a video utilizing a machine studying mannequin from Roboflow to detect hand management options. The perform begins by initiating a prediction job by the mannequin.predict_video technique, specifying the frames per second (fps) and prediction sort. This technique returns a job ID, a signed URL, and an expiration time for the prediction. The perform then enters a polling section, the place it repeatedly requests the prediction outcomes till they’re prepared.
As soon as the outcomes are obtained, the perform extracts the predictions and the corresponding body offsets. These predictions are particular to every body the place the mannequin has detected options. The video is then opened utilizing OpenCV’s VideoCapture, and its properties reminiscent of body width, top, and fps are retrieved. To arrange for saving the processed video, a video author is initialized with the H264 codec.
The perform processes every body of the video in a loop. If the video supply is from a webcam, every body is flipped horizontally utilizing cv2.flip to appropriate the mirrored impact usually seen in webcam recordings. For frames with predictions, bounding containers are drawn across the detected options. That is achieved by changing the OpenCV body to a PIL picture, drawing the bounding containers utilizing ImageDraw.Draw, after which changing the PIL picture again to an OpenCV body. If the supply is a webcam, the x-coordinates of the bounding containers are adjusted to account for the horizontal flip.
After processing, every body with the annotated bounding containers is written to the output video utilizing the video author. This loop continues till all frames are processed. The video seize and author assets are then launched. The perform compiles a textual abstract of the predictions, together with the time of every prediction and the main points of the detected options. Lastly, it returns the trail to the output video and the abstract of the outcomes.
# Import the mandatory libraries
from roboflow import Roboflow
import gradio as gr
from PIL import Picture, ImageDraw
import os
import cv2
import numpy as np # Initialize the Roboflow shopper
rf = Roboflow(api_key=os.environ["ROBOFLOW_API_KEY"])
challenge = rf.workspace().challenge("egohands-public")
mannequin = challenge.model("9").mannequin # Outline a prediction perform to deduce on a video
def infer_video(video_path, supply="add"):
    # Predict the video utilizing Roboflow
    job_id, signed_url, expire_time = mannequin.predict_video(
        video_path,
        fps=5,
        prediction_type="batch-video",
    )     # Ballot for the outcomes
    outcomes = mannequin.poll_until_video_results(job_id)

    # Extract the predictions and body offsets
    predictions = outcomes['egohands-public']
    frame_offsets = outcomes['frame_offset']

    # Open the unique video
    cap = cv2.VideoCapture(video_path)

    # Get the video properties
    frame_width = int(cap.get(cv2.CAP_PROP_FRAME_WIDTH))
    frame_height = int(cap.get(cv2.CAP_PROP_FRAME_HEIGHT))
    fps = int(cap.get(cv2.CAP_PROP_FPS))

    # Create a video author to avoid wasting the output video
    video_writer = cv2.VideoWriter('output_video.mp4', cv2.VideoWriter_fourcc(*'h264'), fps, (frame_width, frame_height))

    current_frame = 0
    pred_index = 0     whereas cap.isOpened():
        ret, body = cap.learn()
        if not ret:
            break         # Flip the body horizontally if the supply is webcam
        if supply == "webcam":
            body = cv2.flip(body, 1)         # Test if there are any predictions for the present body
        if pred_index < len(predictions) and current_frame == frame_offsets[pred_index]:
            prediction = predictions[pred_index]

            # Convert the body to a PIL picture
            picture = Picture.fromarray(cv2.cvtColor(body, cv2.COLOR_BGR2RGB))

            # Draw bounding containers on the body
            draw = ImageDraw.Draw(picture)
            for pred in prediction['predictions']:
                x = pred['x']
                y = pred['y']
                width = pred['width']
                top = pred['height']

                # Alter the x coordinate for the flipped body if the supply is webcam
                if supply == "webcam":
                    x = frame_width - x                 left = x - width / 2
                high = y - top / 2
                proper = x + width / 2
                backside = y + top / 2
                draw.rectangle([left, top, right, bottom], define="crimson", width=3)

            # Convert the PIL picture again to an OpenCV picture
            body = cv2.cvtColor(np.array(picture), cv2.COLOR_RGB2BGR)

            pred_index += 1

        # Write the body with containers to the output video
        video_writer.write(body)

        current_frame += 1

    cap.launch()
    video_writer.launch()

    # Extract related outcomes for show
    display_results = ""
    for pred in predictions:
        display_results += f"Time: {pred['time']}n"
        for field in pred['predictions']:
            display_results += f"Class: {field['class']}, Confidence: {field['confidence']:.2f}n"

    # Return the output video and the show outcomes
    return 'output_video.mp4', display_results
Set your your Roboflow API key in your setting like so:
export ROBOFLOW_API_KEY=""
Learn to retrieve your Roboflow API key
Step #3: Create the Interface
Now that now we have outlined our prediction perform, we’ll create the person interface for our app utilizing gradio.Interface and Gradio parts.
The code under creates a Gradio interface for a video processing software that detects hand options in movies. The interface is about up with the gr.Interface perform, which specifies numerous parts and their configurations. The perform infer_video is assigned to course of the enter video.
The enter parts embrace a video enter factor (gr.Video) and a radio button (gr.Radio) labeled “What’s your video supply?” with choices “add” and “webcam.” This enables customers to both add a video file or specify that the video is recorded from a webcam, offering flexibility within the supply of the video knowledge.
The outputs of the interface are outlined as a video (gr.Video) and a textbox (gr.Textbox) labeled “Outcomes.” The video output will show the processed video with the detected hand options, whereas the textbox will present a textual abstract of the detection outcomes.
# Create a Gradio interface
myInterfcae = gr.Interface(
    fn=infer_video,  # Operate to course of the enter
    inputs=[gr.Video(), gr.Radio(["upload", "webcam"], label="What's your video supply?")],  # Enter sort is video and a radio button for supply
    outputs=[gr.Video(), gr.Textbox(label="Results")],  # Output is video and textual content
    title="Hand Detection from Video",
    description="Add a video to detect hand. Choose 'webcam' if the video is recorded from a webcam."
) if __name__ == "__main__":
    myInterfcae.launch()
Step #4: Launch the Interface
The ultimate step will likely be to launch your interface domestically to check it. Gradio will create an area server and open the app in your internet browser. To run the app, save the next script to a file, for instance, gradio_app.py, and execute it:
python gradio_app.py
Right here is the results of our script:
Conclusion
Creating a pc imaginative and prescient app with Gradio is each accessible and environment friendly, due to its intuitive interface and strong integration capabilities. Through the use of Roboflow for mannequin coaching and Gradio for app deployment, we demonstrated the right way to construct and deploy highly effective functions for each picture and video inference. Gradio provides quite a lot of parts appropriate for pc imaginative and prescient apps past the essential picture and video inputs.
The gradio.Gallery part can be utilized to show a number of photos in a grid format, helpful for functions that require comparability of outcomes or showcasing a number of examples. The gradio.File and gradio.UploadButton part helps importing numerous file sorts, which will be useful for batch processing situations.
For visualizing knowledge and predictions, Gradio’s gradio.Plot part will be significantly helpful. Through the use of these numerous Gradio parts, you’ll be able to create complete and versatile pc imaginative and prescient apps. Whether or not working with photos, movies, or real-time knowledge, Gradio’s easy-to-use interface and intensive part library empower builders to create strong interfaces for pc imaginative and prescient functions.