Introduction
On this publish we are going to stroll by way of the method of deploying a YOLOv8 mannequin (ONNX format) to an Amazon SageMaker endpoint for serving inference requests, leveraging OpenVino because the ONNX execution supplier. We’ll begin by organising an Amazon SageMaker Studio area and consumer profile, adopted by a step-by-step pocket book walkthrough.
By the tip of this tutorial, you should have a greater understanding of tips on how to make the most of Amazon SageMaker for deploying your ONNX fashions.
Full pocket book right here. Let’s get began!
Arrange Amazon StageMaker Studio
Earlier than we dive into the pocket book walkthrough, guarantee that you’ve got accomplished the next steps:
1) Arrange a SageMaker Studio area and consumer profile
A. Area overview
B. Area fast setup
C. Add/take away area consumer profile
D. Launch Amazon SageMaker Studio
2) Begin SageMaker Studio

First, go to your consumer profile and click on on the launch button to open the studio. Then, add this pocket book to the studio documented right here.
Subsequent, choose a SageMaker kernel because the configuration talked about under:
- Picture: Base Python 3.0
- Kernel: Python 3
- Occasion sort: ml.t3.medium
- Begin-up script: No script
YOLOv8 Mannequin Conversion and AWS S3 Add
Subsequent, we will put together our mannequin for inference in SageMaker Studio Labs.
Within the code under, we obtain the yolov8 Pytorch mannequin from the Roboflow GitHub repo and export ONNX weights utilizing the ultralytics YOLO CLI. Then, we zips (as “.tar.gz” file) to be used in importing to S3, the Amazon storage product that we’ll use to work together with our weights in SageMaker Studio Labs. The mannequin is then uploaded to S3 to be used in SageMaker Studio Labs.
!mkdir -p mannequin
%cd mannequin
!wget https://github.com/roboflow/sagemaker-yolov8/tree/foremost/yolov8-weights/runs/detect/prepare -O yolov8n.pt # Convert pytorch model of YOLOV8 mannequin file to onnx format
if not os.path.isfile('/residence/ec2-user/SageMaker/mannequin/yolov8n.onnx'): !yolo mode=export mannequin=yolov8n.pt format=onnx dynamic=True # To get a static mannequin chnage dynamic flag to False
else: print("ONNX file alreday exist. Please re-run the cell after eradicating it.") # Mannequin must be zipped earlier than storing right into a S3 bucket
import tarfile
import os source_files = ['/root/model/yolov8n.onnx']
output_zip_file = '/root/mannequin/mannequin.tar.gz' if not os.path.isfile(output_zip_file): with tarfile.open(output_zip_file, mode="w:gz") as t: for sf in source_files: t.add(sf, arcname=os.path.basename(sf)) print(f"ZIP file is created at {output_zip_file} location.")
else: print(f"ZIP file '{output_zip_file}' exist already. Please re-run the cell after eradicating it.") print("<bucket>: ", bucket) # Add the mannequin to default S3 bucket of your sagemaker area
model_location = session.upload_data(path=output_zip_file, key_prefix='deployment_model')
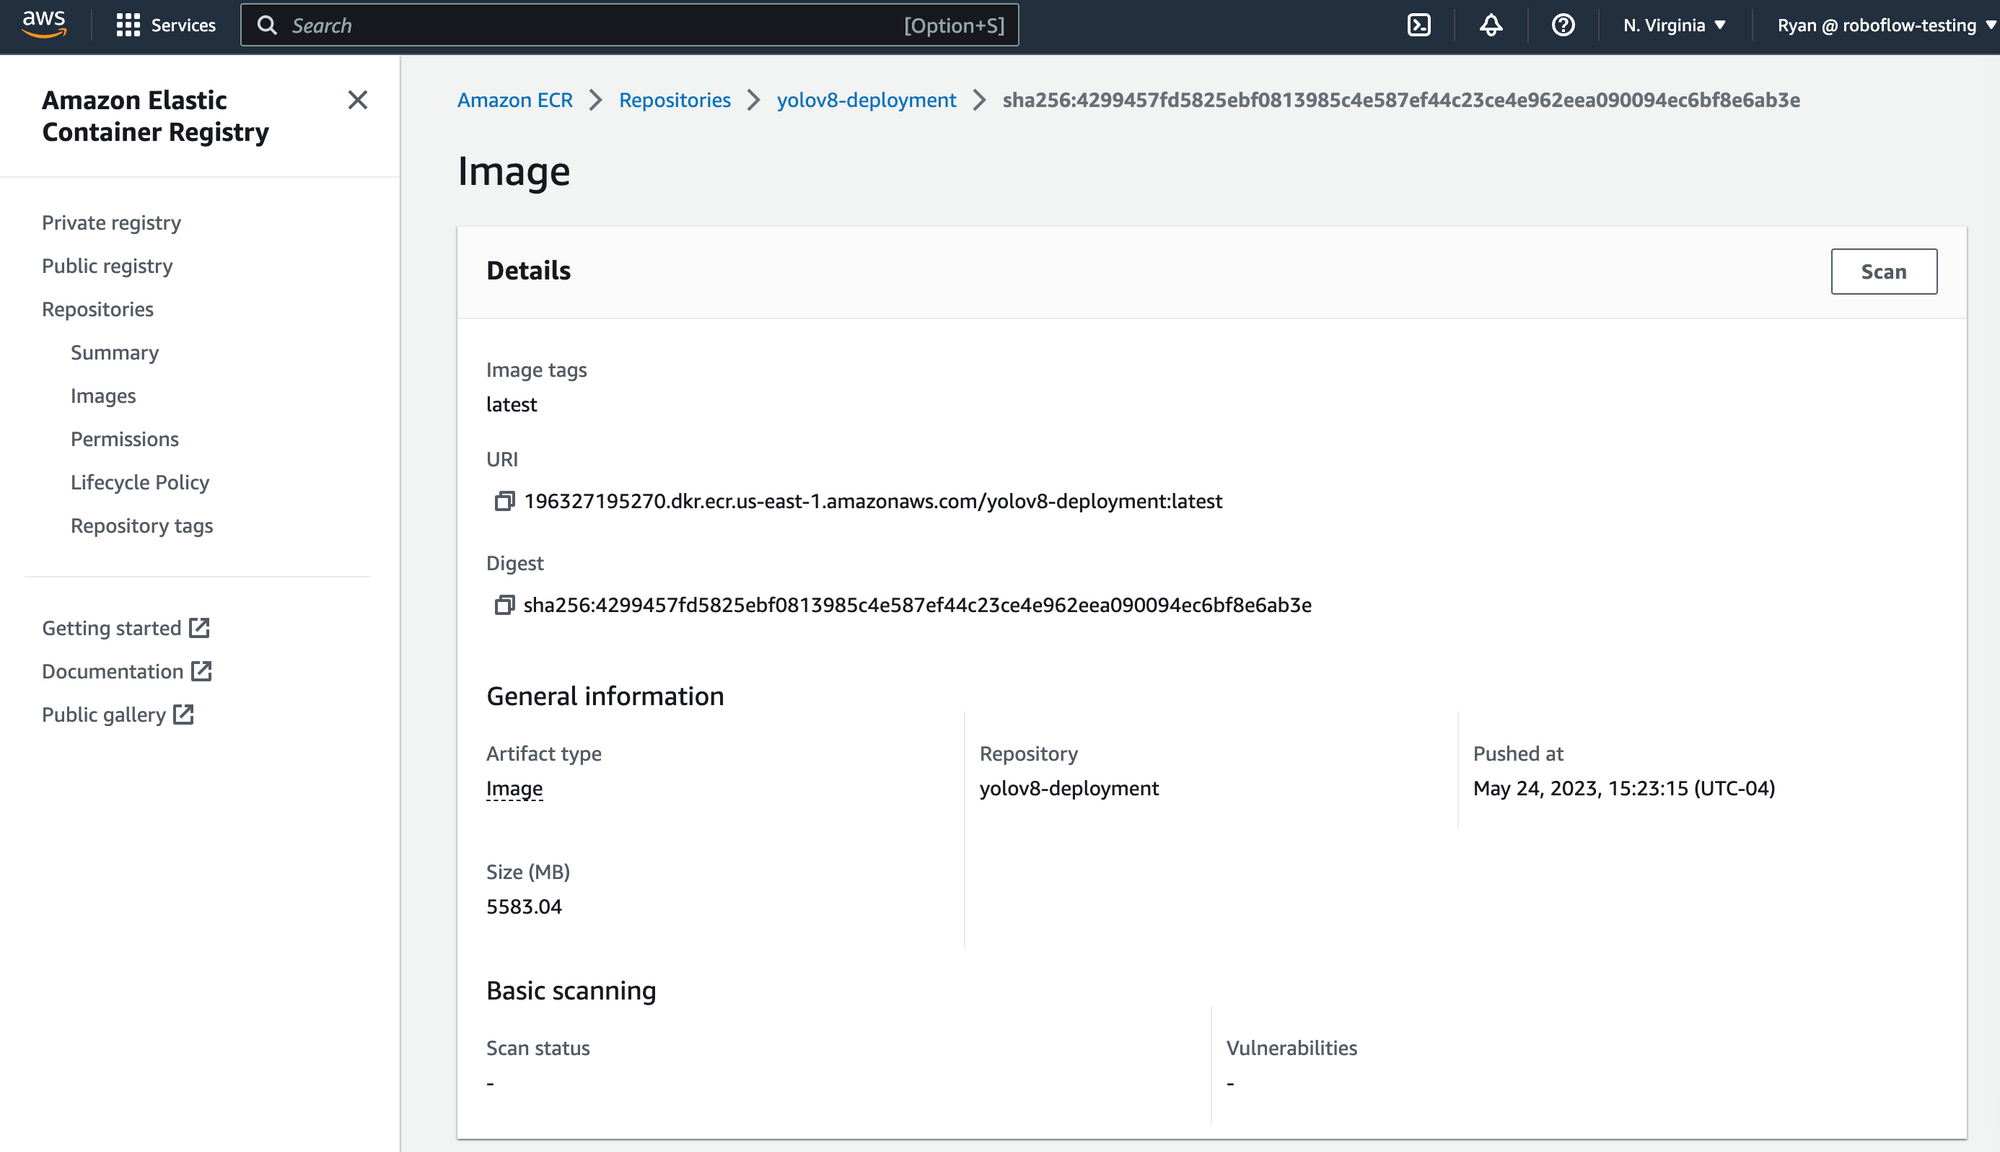
print(f"Zip file is uploaded to {model_location} location of '{bucket}' S3 bucket.")Construct Docker Picture on AWS Elastic Container Registry
Subsequent, we have to create a customized service script, container entry level script, and a Docker file to deploy the ONNX mannequin to a SageMaker inference endpoint.
Run cells 12,13, and 14 on this full pocket book to put in writing the Docker recordsdata to a listing referred to as “docker-inference” which is able to create a DockerFile, dockerd-entrypoint.py and model-script.py.
# Creating an ECR uri to inference with the construct docker picture
ecr_repository = 'yolov8-deployment'
tag = ':newest'
uri_suffix = 'amazonaws.com'
inference_repository_uri = '{}.dkr.ecr.{}.{}/{}'.format(account_id, t/mannequin/mannequin.tar.gz' %cd ..
!mkdir -p docker-inference
This step must be manually carried out in an AWS EC2 occasion. To construct the picture, obtain the “docker-inference” folder from “File Browser” part and follows the instructions talked about under to push the Docker picture to an AWS Elastic Container Registry (ECR).
- Construct the picture with
ecr_repositorytag.sudo docker construct -t <ecr_repository> docker-inference/ - Re tag the picture with
inference_repository_uriidentify.sudo docker tag <ecr_repository> <inference_repository_uri> - Create an AWS ECR and login into to push the picture.
A.aws ecr get-login-password --region <area> | sudo docker login --username AWS --password-stdin <account_id>.dkr.ecr.<area>.amazonaws.com
B.aws ecr create-repository --repository-name <ecr_repository>
C.sudo docker push <inference_repository_uri>
Deploy YOLOv8 Mannequin to Sagemaker
Now deploy the mannequin to a SageMaker endpoint. The occasion measurement to make use of for deployment is ml.c6i.xlarge. Be certain the picture is constructed and pushed to ECR earlier than making an attempt out this half.
import sagemaker
from sagemaker import Mannequin ENDPOINT_NAME = "YOLO-V8-DEPLOYMENT"
yolo_model = Mannequin( model_data=model_location, position=position, image_uri=inference_repository_uri, identify='YOLO-V8-deployment-1') yolo_model.deploy(initial_instance_count=1, instance_type='ml.c6i.2xlarge', endpoint_name=ENDPOINT_NAME)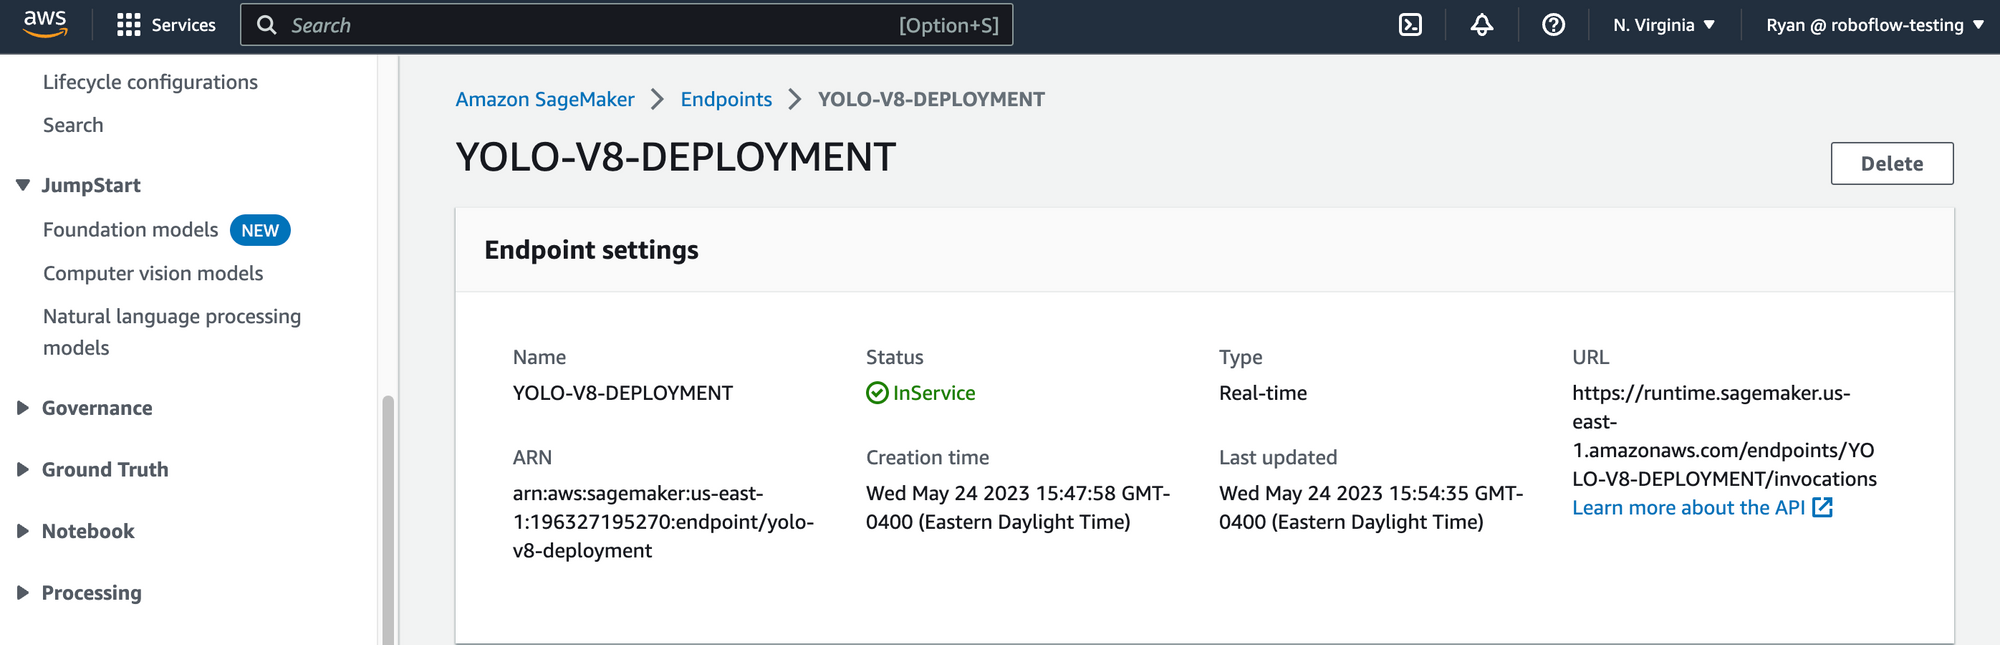
YOLOv8 Inference with Amazon SageMaker
Now we’re able to run our mannequin! Within the script under, we show tips on how to run inference in your YOLOv8 mannequin. First, present a URL of a picture on which you wish to run inference on enter information. Then, add a comma then specify the system sort on which inference ought to run. Supported picture varieties are ‘jpg’, ‘jpeg’, ‘png’ and system varieties are ‘cpu’ & ‘CPU_FP32’.
Setting cpu because the system sort will carry out the ONNXRuntime inference with default CPU EP(MLAS). Setting CPU_FP32 will carry out the ONNXRuntime inference with OpenVINO EP.
payload2 = "https://github.com/roboflow/sagemaker-yolov8/blob/foremost/yolov8-weights/runs/detect/predict/canine.jpeg,CPU_FP32" # warmup steps
for _ in vary(warmup_steps): predictor.predict(payload2) !sleep 10 total_latency = 0
for _ in vary(num_iter_steps): response2 = predictor.predict(payload2) total_latency += float(response2.decode().break up('n')[0].break up(':')[1][:-1].strip()) print("(OpenVINO EP) Avg Latency In Seconds: ", total_latency/num_iter_steps)
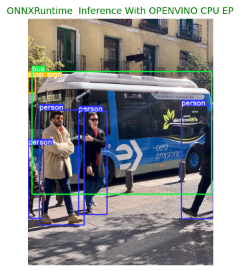
print("nSingle Inference Particulars:n",response2.decode()) # Dsiplay the output
# replace the labels, factors and confidences together with your inference output labels2 = ['person', 'stop sign', 'person', 'person', 'person', 'bus']
points2 = [[(0, 551), (67, 874)], [(0, 255), (32, 325)], [(221, 406), (345, 857)], [(670, 380), (810, 876)], [(49, 399), (245, 903)], [(17, 231), (802, 768)]]
confidences2 = [0.30, 0.35, 0.82, 0.85, 0.87, 0.87] show('bus.jpg', labels2, points2, confidences2, class_to_idx, 'ONNXRuntime Inference With OPENVINO CPU EP')Right here is an instance prediction:
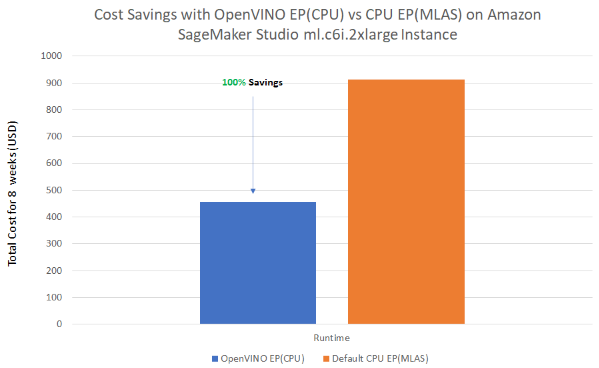
Price Evaluation: OpenVINO vs Default CPU
The benchmark outcomes under show the price saving comparability of “OpenVINO Execution supplier” over “Default CPU(MLAS) Execution supplier”. The outcomes could also be useful when deciding which ONNXRuntime is finest to your purposes.
Conclusion
On this information, now we have constructed a YOLOv8 object detection mannequin and deployed to a AWS SageMaker endpoint, serving inference requests with ONNXRuntime and OpenVino because the execution supplier.