The article under was contributed by Timothy Malche, an assistant professor within the Division of Laptop Purposes at Manipal College Jaipur.
With pc imaginative and prescient and Web of Issues (IoT) know-how, you possibly can construct an utility that tracks your efficiency in train. For instance, you possibly can rely what number of push ups you do. Such an automatic counter means that you can observe how far you might be in your routine with out manually preserving observe.
On this weblog put up I’ll present how I made an train tracker challenge that makes use of the facility of pc imaginative and prescient and IoT applied sciences to revolutionize your health routine.
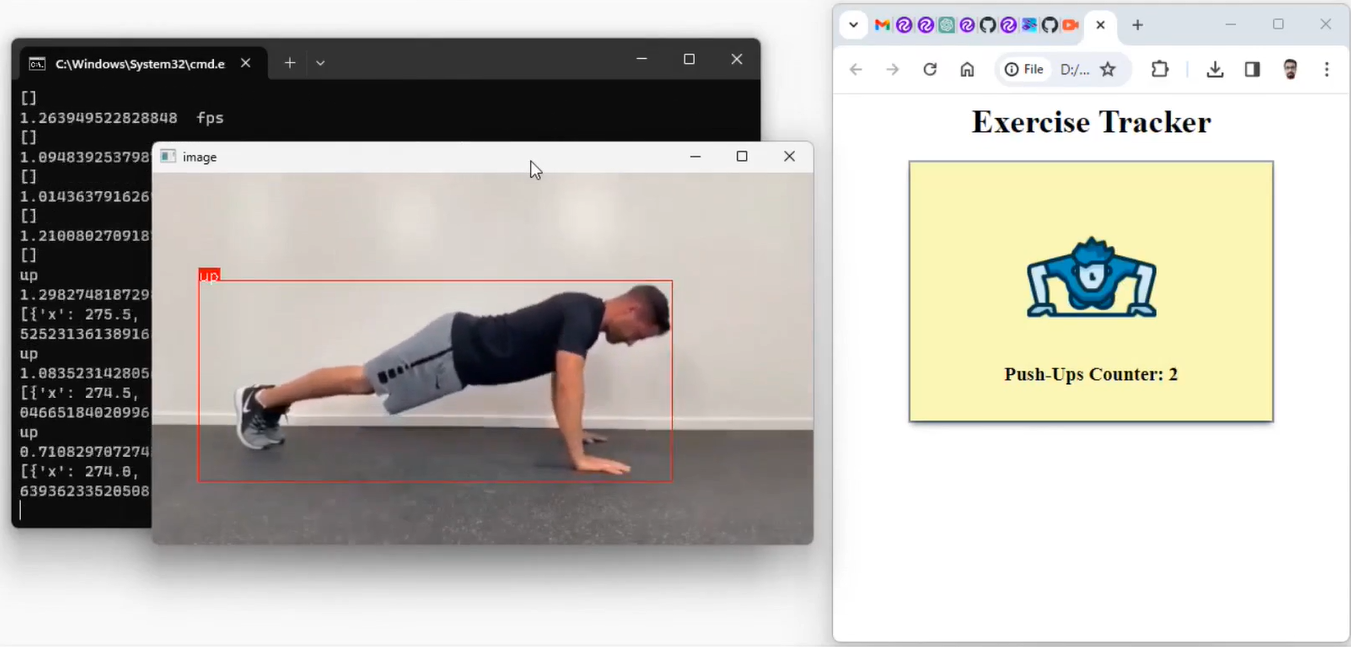
Here’s a screenshot of the system in motion:
How the Venture Works
The train tracker system includes an IoT sensor node with a camera-based setup able to executing Roboflow’s Python SDK for inferencing. This sensor node captures train poses and makes use of an object detection mannequin construct with Roboflow platform to categorise these poses. The detected pose is then printed to an MQTT dealer over the web.
An utility that’s subscribed to the dealer counts every pose detected by the JavaScript utility. The train rely is printed within the internet UI of the applying to maintain observe of the train pose. The working of the system is represented within the following determine.

Utilizing both Jetson Nano or Raspberry Pi, an IoT digicam node makes use of a custom-built mannequin from the Roboflow inference server to categorise train poses. The end result, extracted from the class_name variable, is then printed to the MQTT subject estatus on the MQTT Dealer.
In the meantime, the consumer utility, written in JavaScript, subscribes to the info on the estatus subject, calculates and shops the rely in a counter variable, and presents the train pose rely to the person on Internet UI.
How the System is Developed
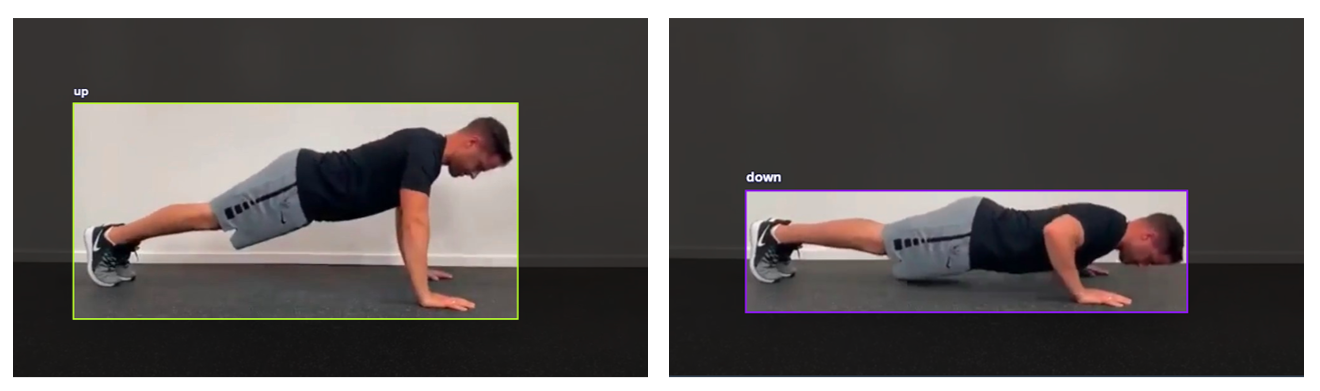
To successfully classify varied train poses, resembling push-ups in our instance, we are going to use an object detection mannequin. For this information, we are going to give attention to push ups. We are going to practice an object detection mannequin to establish one in every of two train states: ‘push-up’ and ‘push-down.’ These distinct states function the muse for figuring out and calculating the push-up rely.

Fig 2: Push-Up and Push-Down states of the pose
Listed here are the steps used to develop the system:
- Accumulate and label a dataset
- Practice an object detection mannequin
- Run Inference to categorise train pose and ship end result
- Write a JavaScript utility to calculate and show the train pose rely
Step #1: Accumulate and label a dataset
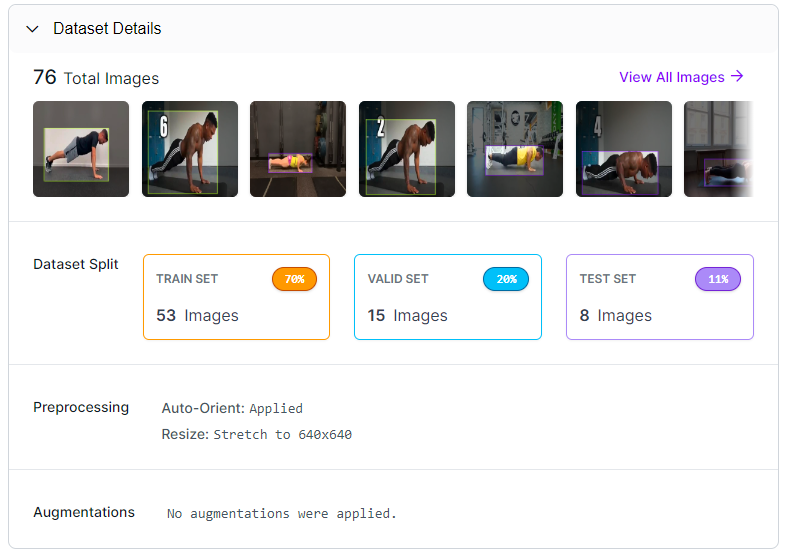
The picture dataset for the push-ups train, encompassing the beforehand talked about two distinct states, was collected manually, and uploaded to the Roboflow platform for labelling.

Every picture has been labelled utilizing bounding bins to tell apart between the 2 lessons: ‘up’ and ‘down,’ representing the ‘push-up’ and ‘push-down’ states of the pose, respectively.

Step #2: Practice an object detection mannequin
Upon completion of the labelling course of, a dataset model is generated, and the mannequin undergoes coaching utilizing the Roboflow auto-training possibility.
The coaching accuracy achieved is 99.5%.
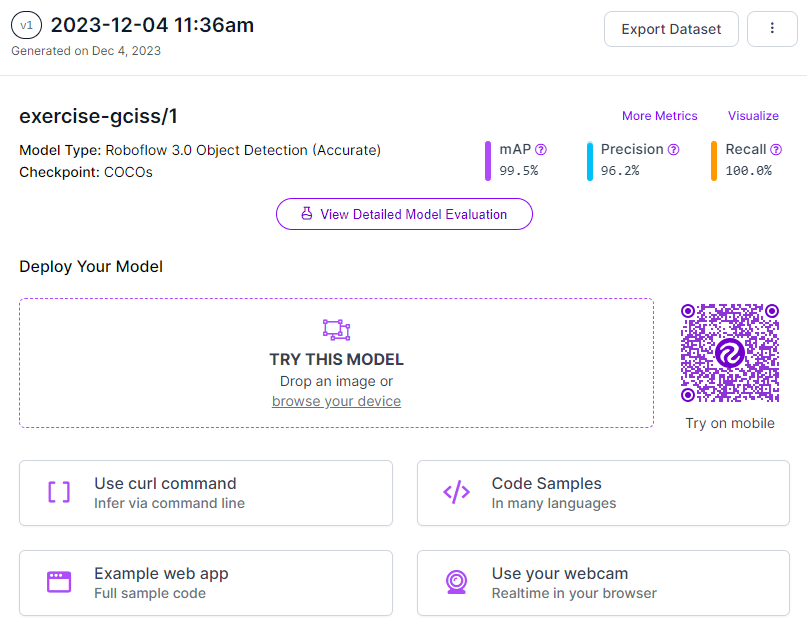
As soon as the mannequin is educated, it’s robotically deployed to a cloud API.
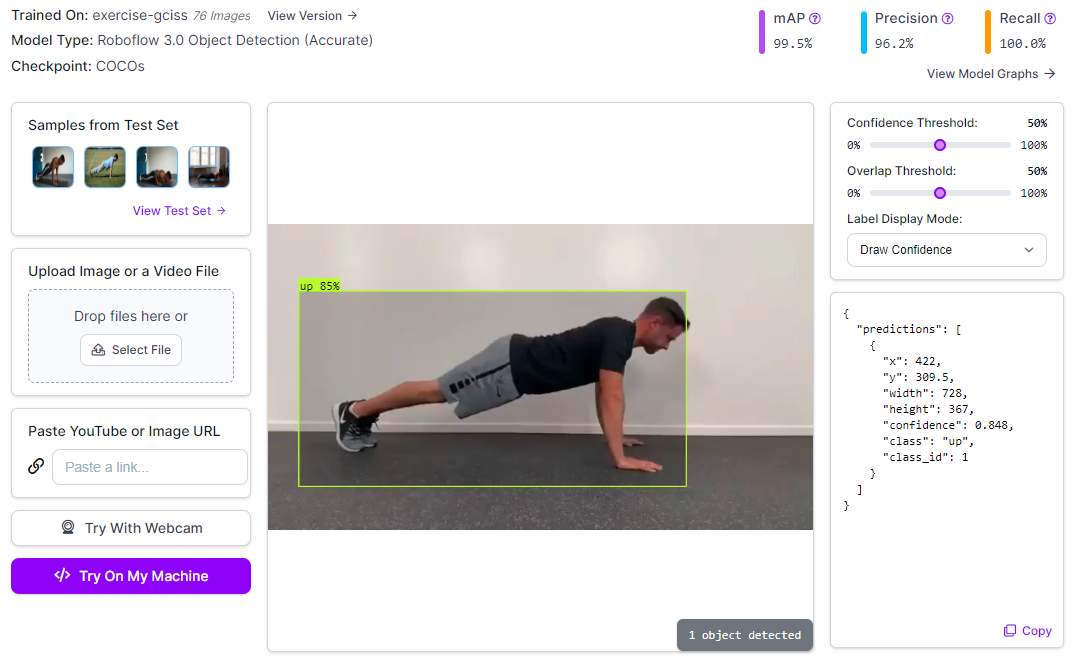
Roboflow gives a spread of choices for testing and deploying the mannequin, together with dwell testing in an internet browser and deployment to edge units. The next picture reveals the mannequin examined utilizing the Roboflow internet interface.
Step #3: Detect train pose and ship end result over MQTT
On this challenge, the code sourced from the Roboflow GitHub repository is used to run inference through python script. The offered python code from Roboflow repository accepts a digicam feed and processes video information from the digicam by way of the educated mannequin. To make use of the mannequin, it’s important to populate the “roboflow_config.json” configuration file with particular values. These values embrace pertinent details about the mannequin and an API key for authentication with Roboflow.
{
    "__comment1": "Get hold of these values through Roboflow",
    "ROBOFLOW_API_KEY": "YOUR_API_KEY",
    "ROBOFLOW_WORKSPACE_ID": "tim-4ijf0",
    "ROBOFLOW_MODEL_ID": "exercise-gciss",
    "ROBOFLOW_VERSION_NUMBER": "1",
    "ROBOFLOW_SIZE": 640,
    "EMAIL": "YOUR_EMAIL",

    "__comment2": "The next are solely wanted for infer-async.py",
    "FRAMERATE": 24,
    "BUFFER": 0.5
}
The detection outcomes from the Python script are broadcasted to an MQTT dealer over the web. We have to set up the PAHO MQTT python library on the system to be able to use it within the Python script that we’re utilizing. The library might be put in with the next command:
pip set up paho-mqttAfter the MQTT library is put in, it may be included in our python code for object detection from Roboflow as follows:
import paho.mqtt.consumer as mqttThe following step is to specify the MQTT dealer particulars and set up the connection as given in code under
broker_address="dealer.hivemq.com"
port=1883 consumer = mqtt.Shopper("exer1") #create new occasion
consumer.join(broker_address, port) #connect with MQTT dealer
For this information, the free HiveMQ MQTT dealer is used.
Then contained in the infer() technique use the next line of code to publish the title of the detected class to MQTT dealer on the subject estatus.
consumer.publish("estatus", class_name) # publish detected class to MQTT DealerThe up to date infer() technique from Roboflow code repository detects and classifies the train pose primarily based on the educated mannequin. The detected class saved within the class_name variable, which is distributed to the MQTT dealer. Operating the Python code shows the next output:
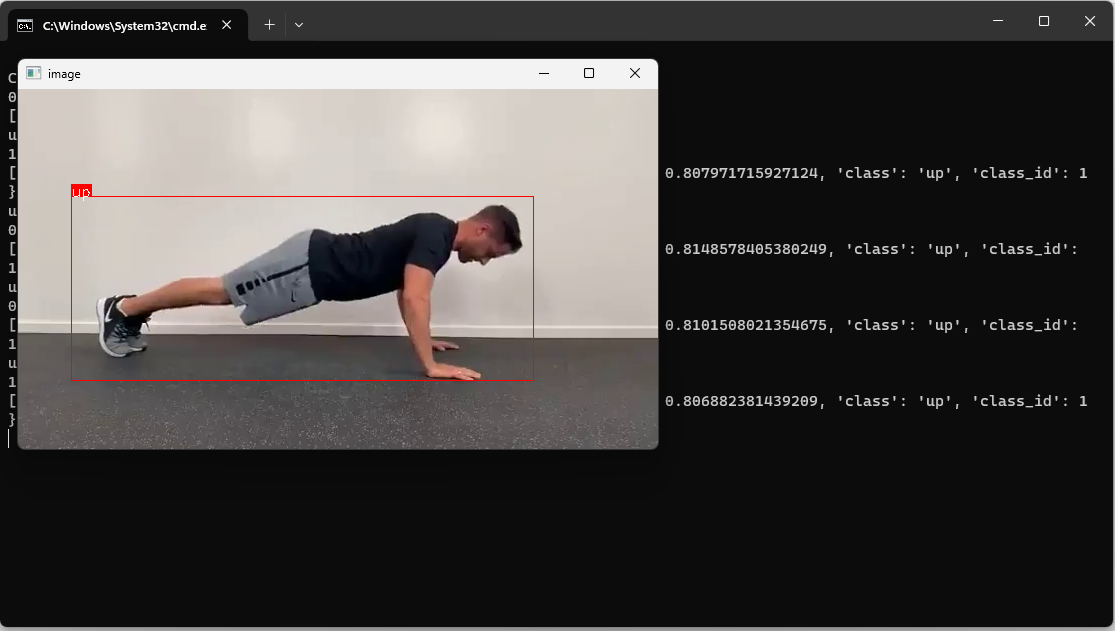
The info is distributed to the MQTT dealer within the background.
Step #4: Calculate and show the train pose rely
On this step we construct a easy JavaScript utility that makes use of PAHO MQTT JavaScript library to connect with MQTT dealer and subscribe to the MQTT subject estatus.
The PAHO MQTT library for JavaScript might be included in a HTML doc with following code:
<script src="https://cdnjs.cloudflare.com/ajax/libs/paho-mqtt/1.0.1/mqttws31.min.js" sort="textual content/javascript"></script>Subsequent, we are able to outline the UI to show the end result as given in code under:
<div id="standing"> <img src="push-up.png" model="width:50%"> <h3 id="msg">NA</h3>
</div>
Then, we are able to set up a connection to the dealer:
consumer = new Paho.MQTT.Shopper("dealer.hivemq.com", 8000 ,"exercie-client-001");After this, we subscribe to the subject estatus on which the Object Detection python code from Roboflow repository publishes the results of the detected class from variable class_name.
perform onConnect() {
 consumer.subscribe("estatus");
}
Lastly, we are able to write code to maintain observe of the rely of the push-ups. Within the following code a counter shall be incremented on ‘up’ class for the ‘push-up’ pose.
perform onMessageArrived(message) {
  if (message.payloadString === "down") {
     upMessageProcessed = false; // Reset the flag when the message is "down"
  } else if (message.payloadString === "up" && !upMessageProcessed) {
    // Increment the counter solely as soon as when the message is "up"
    counter++;
    doc.getElementById("msg").innerHTML = "Push-Ups Counter: " + counter;
    upMessageProcessed = true; // Set the flag to true after incrementing the counter
  }
}
We increment the counter solely when a category (e.g., ‘up’) is initially detected. The counter variable is then up to date if the identical class is detected once more after the detection of one other class (e.g., ‘down’)
Within the code above, the counter increments solely as soon as till the following change within the detection result’s reported. The counter will solely increment one for the ‘up’ message till the following change is reported. This ensures the counter doesn’t increment with every prediction. Incrementing the counter with every prediction can be problematic as a result of 10 `up` detections in a row would increment the counter 10 occasions, even when there was no `down` message
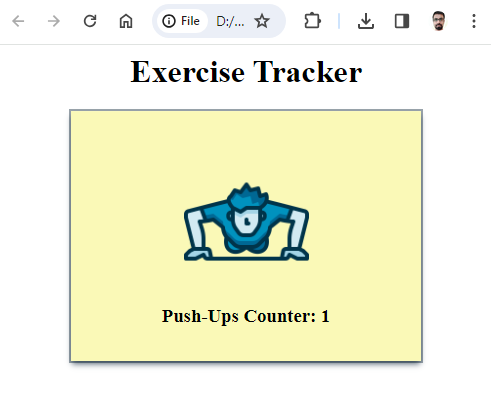
The upMessageProcessed flag ensures that the counter is just not incremented once more for ‘up’ message till after a ‘down’ message is obtained. The next would be the output once we run the code.
Conclusion
On this challenge we have now carried out a pc imaginative and prescient pipeline to observe and observe train poses for Push-Ups train. Related strategies can be carried out for different sorts of workout routines.
With the assistance of object detection outcomes from our pc imaginative and prescient mannequin, the challenge precisely extracts details about the train poses and publishes the outcomes of the detected pose on an MQTT dealer over the web JavaScript logic is used to calculate the pose counts. These counts are displayed on an internet interface
The potential functions of this train monitoring system are huge, starting from customized health coaching to distant monitoring of exercise classes.
All code for this challenge is offered at GitHub. The dataset used for this challenge is offered on Roboflow Universe.